![]()
![]()
![]()
Screen savers have taken on a life of their own in the computer industry. These whimsical distractions originally were created for a serious purpose: to stop phosphor burn-in of text or graphics on a monitor. Have you ever seen a monitor on a computer
or (very often) an ATM that looks as though you can see a shadow of its title screen or main menu, even when something else is being displayed? This shadow is the result of displaying that same screen for hours on end and permanently burning its image into
the monitor.
Obviously, this is not a good thing. So someone, somewhere, decided to blank the screen after a while to keep this from happening. But this made the users think the computer had shut itself off. So the developer created an animated display to make it
clear that the computer was, in fact, still alive. And this was the beginning of something big.
Although today, modern color monitors are not really at risk of anything like phosphor burn-in, screen-savers have become a big business. Developers always seem to have a surplus of creativity and are just looking for nooks and crannies where they can
express it. And they have exploited this blank computer screen to the hilt for all sorts of complex geometric designs, 3D rendering, animations, video clips, and cartoons. And users have bought them up. They enjoy watching as much as developers enjoy
creating. In the computer industry, screen savers have come to express the triumph of creativity over mundane productivity.
Isn't it difficult to create your own screen saver? Don't you have to muck about with difficult system coding to integrate with the Windows environment? Actually, no. Although there is some complexity when creating screen savers in C or C++, Visual
Basic makes it very easy.
In this chapter, I will walk you through the process of creating a screen saver of your own. Once you have the basic structure down, your imagination is your only limit in creating exciting new screen savers of your own. Create them for yourself, your
co-workers, or share them with the rest of the world for fun or for profit.
As you may have noticed, Windows screen savers have the extension SCR, and they are placed in the Windows subdirectory. They are recognized and displayed as options in the Display Properties dialog box on the Screen Saver tab.
These SCR files are nothing mysterious. In fact, they are nothing more than EXE files that have been renamed! And Windows handles calling these disguised EXEs whenever they should be invoked. So you don't even have to worry about when the screen saver
should start up. All of that is handled for you by Windows.
So what do you have to worry about? Well, to create a very simple screen saver, just two things:
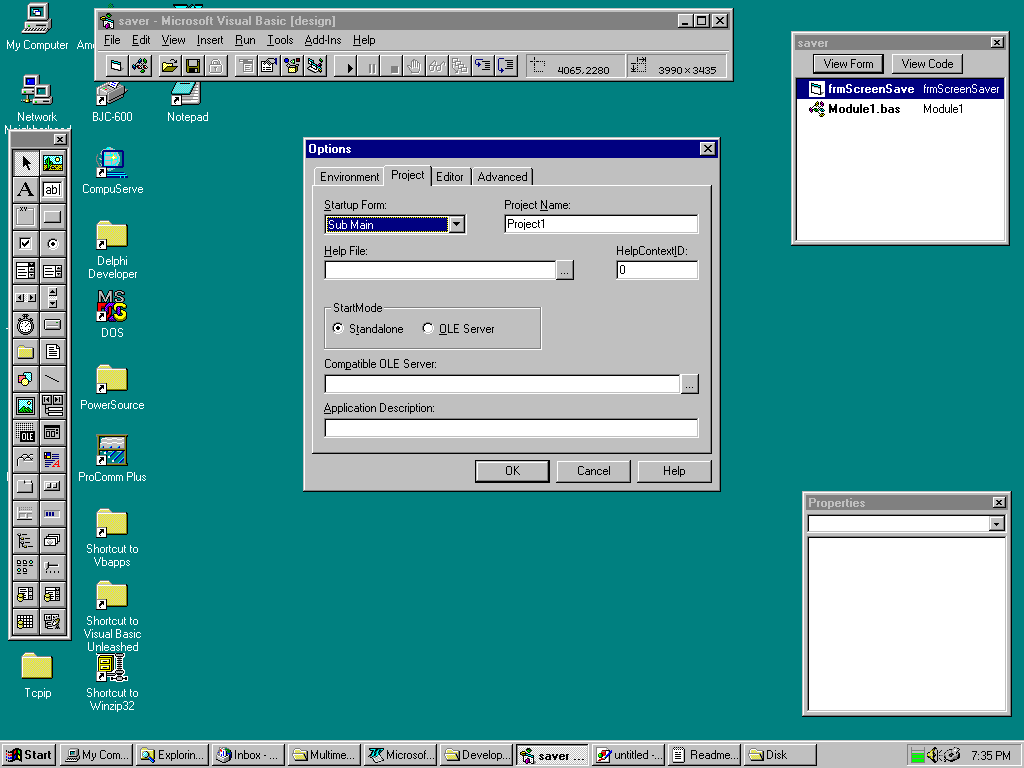
Your first step is to start a new project that has one form and one module. In the module, create a procedure called Main that receives no arguments, and set it to be the first thing called on startup. You do this by choosing Tools | Options and then
working in the Project tab of the Options dialog box, in the Startup Form drop-down list (see Figure 37.1).
Figure 37.1. Setting the Main procedure to be the first thing called.
You want to execute a procedure first thing, because you want to do some checking before you go to the trouble of loading a form. The code for Main is shown in Listing 37.1.
Sub Main()

If App.PrevInstance Then End

If InStr(Command, "/s") > 0 Then

    CursorOff

    frmScreenSaver.Show

ElseIf InStr(Command, "/c") > 0 Then

    MsgBox "No setup necessary for this screen saver", _

        vbOKOnly + vbInformation, "Boxes Screen Saver"

End If

End Sub
First off, you want to check to see whether there is another instance of the program running. If there is, get out.
Otherwise, you call the Command function to find out whether any command-line arguments were passed when the screen saver was called. Why would Windows call the screen saver with command-line arguments? To let you know what it wants you to do. Windows
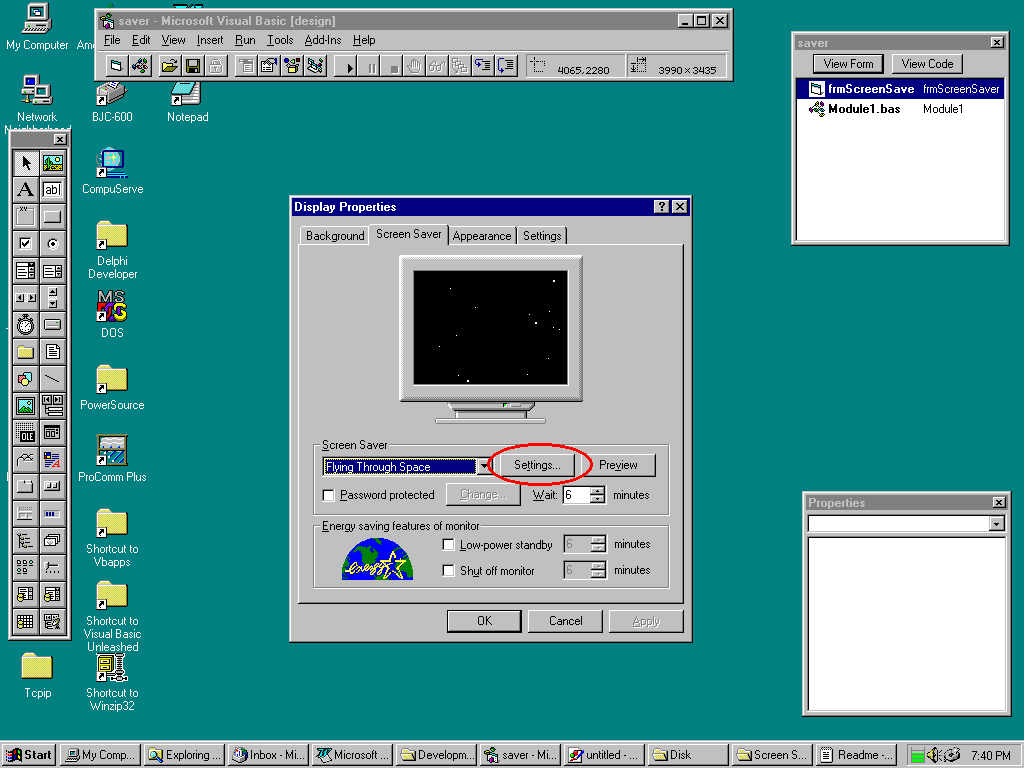
might want you to simply display the screen saver. If this is the case, it sends you an /s. But when the user clicks the Settings button in the Display Properties dialog box (see Figure 37.2), Windows calls your screen saver with a /c. Because I want to
focus on creating a simple screen saver to start, a message box explaining that there is no setup necessary is all you need for that case.
Figure 37.2. After the user clicks the Settings button, the screen saver is called with the /c command-line argument.
If Windows does request the actual screen saver (with /s in the command line), then you want to turn off the cursor (the mouse pointer) and display the screen saver. You don't want the ugly mouse pointer obscuring the user's view of your beautiful
creation, do you? So you need to create a new procedure called CursorOff. There isn't a Visual Basic command that enables you to do this, so you will have to resort to the ShowCursor() Win32 API function. Put the following code in your module's
Declarations section:
Declare Function ShowCursor Lib "user32" (ByVal bShow As Long) As Long
ShowCursor accepts one value. If the value is False (0), it hides the cursor, and if it is True (non-zero), it shows the cursor. Simple, yes? Well, not quite so simple.
When Windows first starts up, it creates a cursor-display counter and sets it to 0. The mouse pointer is displayed when the counter is 0 or greater. If ShowCursor(False) is called, the counter is decremented, putting it at —1. This causes the
cursor to disappear, because any counter value below 0 hides the cursor. But then, suppose that another task in Windows makes a call to ShowCursor(False). The counter is decremented again to —2. The cursor was invisible before and remains invisible.
Then that task finishes whatever it was doing and does a ShowCursor(True). This increments the display counter back up to —1. But because this is still less than zero, it still is not displayed. Finally, the first task that made the call to
ShowCursor(False) finishes up and does a ShowCursor(True). The counter is incremented to 0, and finally the mouse pointer appears again. Make sense? Windows wants to be sure that all the tasks work well together. If task 1 turns off the cursor and task 2
turns it off and back on, task 1 will expect that it is still off until it turns it back on.
It works the same way in the other direction. Several calls to ShowCursor(True) cause the cursor-display counter to increment to higher and higher positive values. Only an equal number of ShowCursor(False) calls actually cause the cursor to disappear.
The catch is that you really, really want it to disappear, regardless of what the display counter is. But, at the same time, you don't want to disturb the counter for other applications. Listing 37.2 shows the CursorOff procedure that will do what you
want.
Public Sub CursorOff()

Dim CurrentCursorDepth As Integer

CurrentCursorDepth = ShowCursor(False)

giCursorDepth = CurrentCursorDepth + 1 'Restore original value

Do While CurrentCursorDepth > —1

    CurrentCursorDepth = ShowCursor(False)

Loop

End Sub
The first thing you do is call ShowCursor(False) and receive its return code into CurrentCursorDepth. ShowCursor() returns the value of the display counter after it is changed by the call, so you increment the value and put the result in giCursorDepth
to return it to the original cursor-display value before you touched it. That way, you can restore it back to this original value later, when CursorOn is called. giCursorDepth is a global defined in the Declarations section of the module:
Global giCursorDepth As Integer
Next, you loop while the current cursor depth is greater than —1. In other words, regardless of where it is now, get it less than 0. If it already is less than zero, this top-tested loop does not execute.
While we're on this topic, let's look at the CursorOn procedure (see Listing 37.3).
Public Sub CursorOn()

Dim CurrentCursorDepth As Integer

CurrentCursorDepth = ShowCursor(True)

Do While CurrentCursorDepth < giCursorDepth

    CurrentCursorDepth = ShowCursor(True)

Loop

End Sub
First, you increment the counter with the ShowCursor(True) and capture the new CurrentCursorDepth. Then the loop tests to see whether the display counter is back where it belongs. If it isn't, it does ShowCursor(True) statements until it is. So you
turned the cursor off and back on again without disturbing the cursor-display counter.
Look back at Listing 37.1. Before we jumped into our discussion on CursorOn and CursorOff, we were looking at the Main procedure. If Windows passes an /s command line argument, that's your cue to display the actual screen saver. After the cursor is
turned off, the code displays frmScreenSaver.
I told you to start off this project by creating a module and a form. So far, we've been talking about the module. Now let's look at the form.
The first thing you will want to do is to name your form frmScreenSaver, because that is what you are showing in the Main procedure. You also will want to change some of the following properties.
Property |
Value |
|
BackColor |
Black |
|
BorderStyle |
None |
|
ControlBox |
False |
|
MaxButton |
False |
|
MinButton |
False |
|
ScaleMode |
Pixel |
|
WindowState |
Maximized |
Next, drop a timer on the form. Leave the default name Timer1, but change the interval to 1,000.
There is no Titlebar True/False property, but changing the BorderStyle to None and the ControlBox, MaxButton, and MinButton to False effectively gets rid of the title bar for you. So, once the window is maximized, it covers everything else on-screen and
provides a large blank slate to do your magic.
Finally, you might want to create an icon for your form. If you associate it with the form's Icon property, you'll be able to choose it as the application's icon when you generate an EXE.
When you are done setting up your window, it should look like Figure 37.3.
Figure 37.3. The frmScreenSaver form.
Just so there won't be any doubt, we have now arrived at the fun part. This is where you loosen the tie and let your creative juices flow. The Timer event gets executed once a second. You can make that much quicker, if you like, by adjusting the
Interval property. The number there is in milliseconds, but you probably aren't going to get much code to execute in a millisecond, so be reasonable in how low you set this property.
Regardless of the interval value, you now have a place to write code that will happen every so often. What do you want to do? Just for the sake of example, I created a very simple graphics routine. My Timer event code is in Listing 37.4.
Private Sub Timer1_Timer()

Dim X1, Y1, X2, Y2 As Integer

Randomize

X1 = Rnd * (ScaleWidth — 1) + 1

Y1 = Rnd * (ScaleHeight — 1) + 1

X2 = Rnd * (ScaleWidth — 1) + 1

Y2 = Rnd * (ScaleHeight — 1) + 1

ForeColor = RGB(Rnd * 255 + 1, Rnd * 255 + 1, Rnd * 255 + 1)

Line (X1, Y1)—(X2, Y2), , BF

End Sub
After declaring some variables and seeding the random number generator, you create a couple of random coordinates in your window's workspace and set the ForeColor property to a random color. Then, using the Line command's BF option, you draw a filled-in
box with the upper- left and lower-right corners defined by the random coordinates. Nothing too amazing here but, like I said, we'll keep it basic this time around and once you get the hang of it, you can jazz it up all you want.
The Timer event continues to fire indefinitely unless we stop it somehow. And how are most screen savers stopped? By a mouse click or a keystroke. Listings 37.5 and 37.6 show you what should be in your MouseDown and KeyDown events.
Private Sub Form_MouseDown(Button As Integer, Shift As Integer, _

  X As Single, Y As Single)

EndScreenSaver

End Sub
Private Sub Form_KeyDown(KeyCode As Integer, Shift As Integer)

EndScreenSaver

End Sub
And what does EndScreenSaver look like? It's a procedure defined in the module that takes no parameters. See Listing 37.7.
Public Sub EndScreenSaver()

CursorOn

End

End Sub
And that's all there is to it. There's just one more thing. Normally, a screen saver goes away even if you just move the mouse. Shouldn't you put something in the MouseMove event? Yes, and that is in Listing 37.8.
Private Sub Form_MouseMove(Button As Integer, Shift As Integer, _

   X As Single, Y As Single)

Static OldX As Integer

Static OldY As Integer

If (OldX > 0 And OldY > 0) And _       'If this isn't the first time and

   (Abs(X — OldX) > 3 Or Abs(Y — OldY) > 3) Then    'there is a big move

       EndScreenSaver

End If

OldX = X

OldY = Y

End Sub
You probably were expecting a routine as simple as the one for the MouseDown and KeyDown events. This one adds a bit of code to verify that the mouse has, in fact, moved more than a pixel or two. Why bother to do this? Several reasons.
First, and most intuitive, you don't necessarily want an accidental touch of the mouse to cause the screen saver to go away. Verifying that there has been a significant change since the last MouseMove event does this.
Second, for some reason, when a window first is opened, Windows triggers a MouseMove event on it. This is not normally a problem. But it would be here, of course. The screen saver would end as soon as it starts. Verifying that there has been an actual
mouse position change before you kill the screen saver fixes the problem.
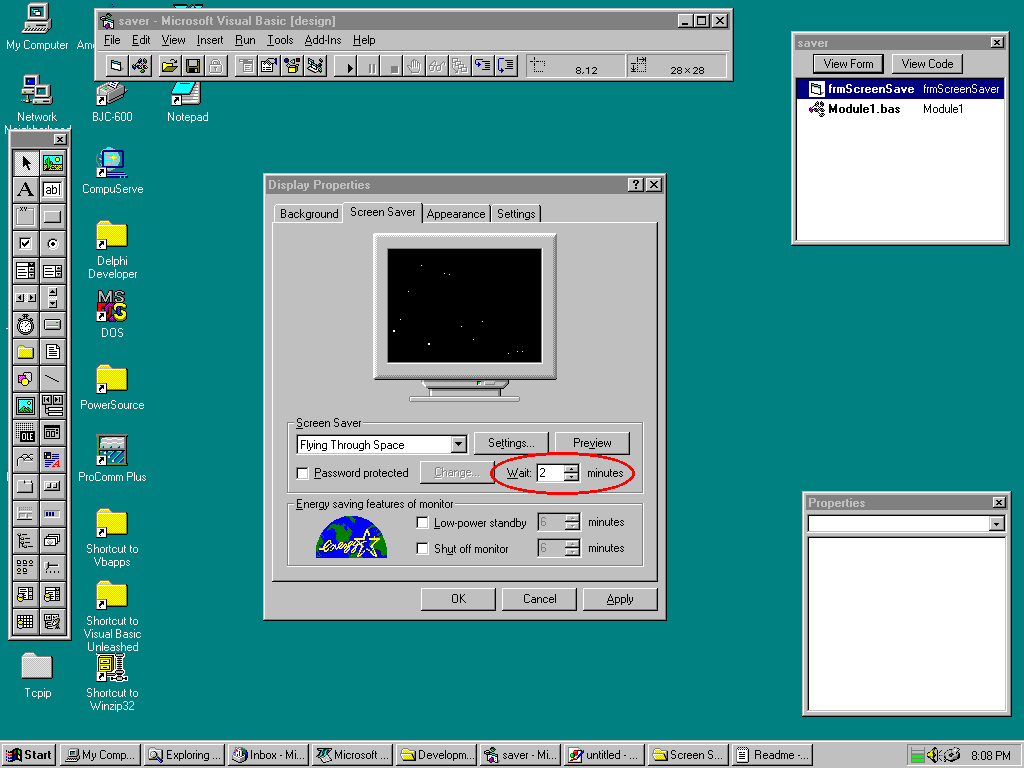
Finally, Windows does another weird thing (keeping a list?). If you set the wait time in the Display Properties dialog box on the Screen Saver tab to two minutes, for example, Windows waits for two minutes without interruption before executing your
screen saver (see Figure 37.4). So far so good. But then, every two minutes after that time, Windows will trigger a MouseMove event on your screen saver. For no reason at all. But again, testing to be sure the mouse did move in the MouseMove event solves
the problem.
Figure 37.4. The wait time in the Display Properties dialog box, on the Screen Saver tab.
That's it! You now have a working product. If you try running it, you might be sad to see that it does nothing. That's because, you will recall, it is looking for a command-line argument: a /c to change its settings or an /s to display the screen saver.
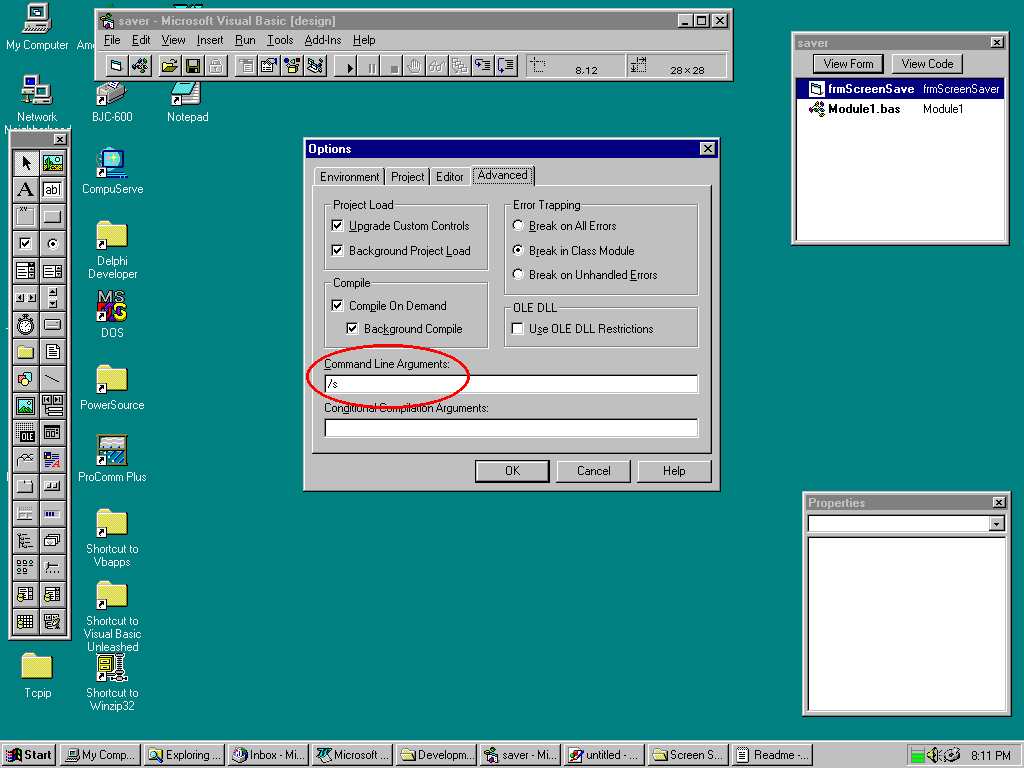
To test it, choose Tools | Options. The Options dialog box appears. From here, choose the Advanced tab. In the Command Line Arguments field, type /s (see Figure 37.5).
Figure 37.5. Specifying a command-line argument for design-time execution.
This edit enables you to simulate passing a command-line argument when you run an application at design time. By using /s, you can view the actual screen saver. (Trying /c would show you only the little message box you created, saying that no setup is
necessary for this screen saver.)
Now when you run the screen saver, you should see a black screen with lots of pretty (or not so pretty, as the case may be) boxes appearing about once a second before your eyes.
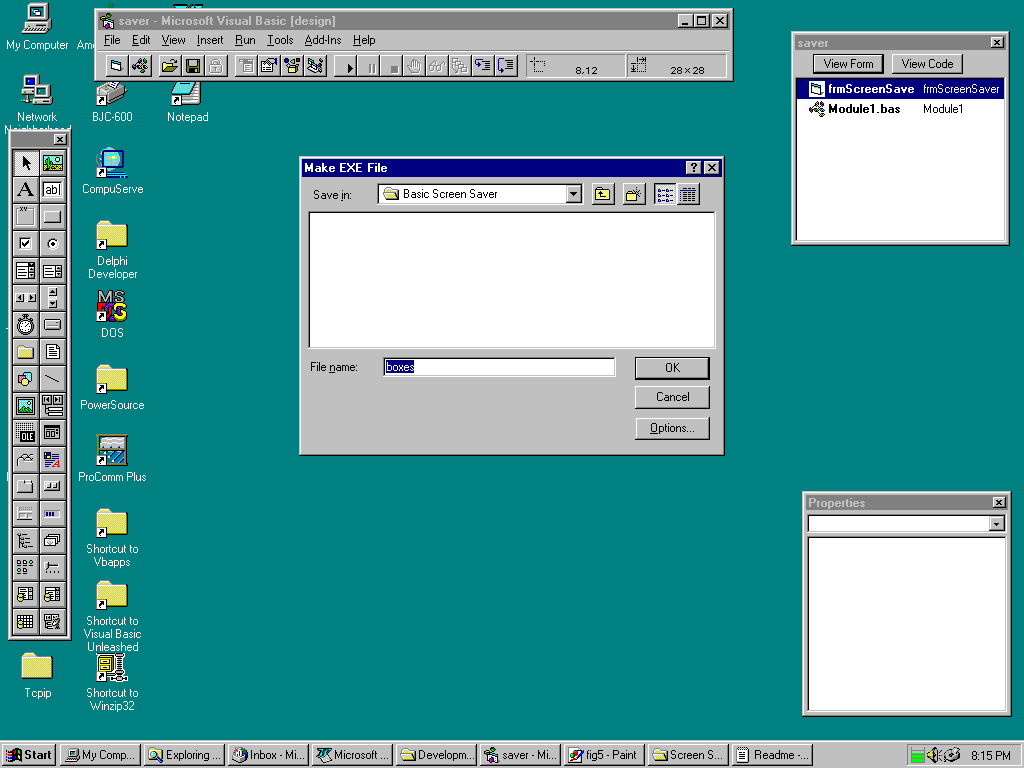
Now you are ready to create the final executable. Creating a screen saver executable is not that different from creating any other executable. First, save your work. (You were doing that all the way along, weren't you?) Then choose File | Make EXE File
to display the Make EXE File dialog box (see Figure 37.6).
Figure 37.6. The Make EXE File dialog box.
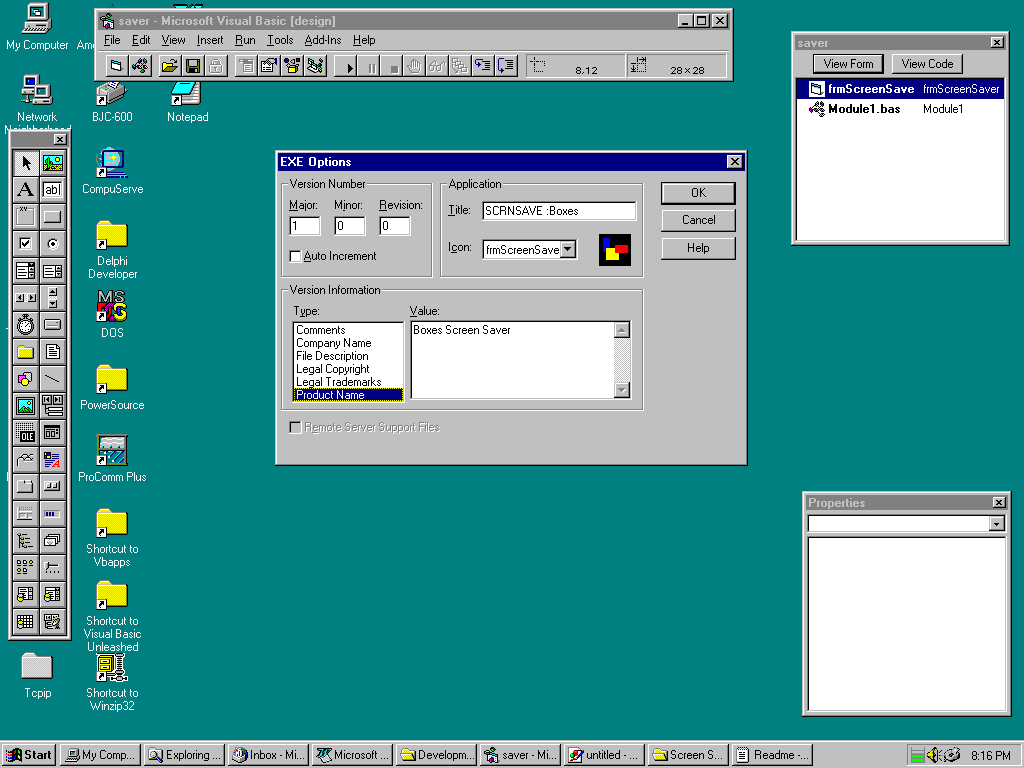
If you click the Options button, you see the EXE Options dialog box, as shown in Figure 37.7.
Figure 37.7. The EXE Options dialog box.
Here, you can specify an icon (by choosing an icon already assigned to one of the forms), a version number, comments, company name, product name, and so on. Fill all this out as you like. There is one crucial thing you must do here, though. Set the
application title to this:
SCRNSAVE: Boxes
This line lets Visual Basic know that this application is to be generated as a screen saver. Click OK in the EXE Options dialog box to return to the Make EXE File dialog box. The only thing left is to make sure that the file is generated with an SCR
extension. Do this by explicitly entering the extension. When you are done, the file name edit control should contain this:
Boxes.SCR
That's it. Click OK, and your new screen saver is generated. After it finishes, copy the screen saver to the Windows directory and then right-click on your desktop. Choose Properties from the pop-up menu and then click the Screen Saver tab after the
Display Properties dialog box appears. Pull down the Screen Saver drop-down list and scroll up to find Boxes. Choose it. Click Preview. You should see the Boxes screen saver at work.
Now set the wait time to one minute, click OK, and wait. Soon, boxes again fill your field of view. You've done it. Good work.
Now you have a template for creating any screen saver you can imagine. What will you do first? A good place to start would be to add a Configuration dialog box that is displayed after the user clicks Settings from the Screen Saver tab in the Display
Properties dialog box.
You probably can figure out how to do this without my help at all, right? All you need to do is create a new form—call it frmSetup. What sort of configuration makes sense for the Boxes screen saver? How about providing an option to add a beep every
time a box comes up? We'll call this new feature BeepBox. Nothing like a little aural stimulation to go with those fetching boxes.
Figure 37.8 shows an example of frmSetup.
Figure 37.8 The layout of frmSetup, providing access to the nifty new BeepBox feature.
Very simple. The thing that's not so simple is this: where are you going to store this setting? A global variable won't work. Your program is going to end and then be called with an /s parameter a second time before you actually display the screen
saver. You'll have to go to an INI file. Add these two lines to your module's Declaration section (Listing 37.9).
Declare Function WritePrivateProfileString Lib "kernel32" _

    Alias "WritePrivateProfileStringA" _

    (ByVal lpApplicationName As String, _

    ByVal lpKeyName As Any, ByVal lpString As String, _

    ByVal lpFileName As String) As Long

Declare Function GetPrivateProfileString Lib "kernel32" _

    Alias "GetPrivateProfileStringA" _

    (ByVal lpApplicationName As String, _

    ByVal lpKeyName As Any, ByVal lpDefault As String, _

    ByVal lpReturnedString As String, ByVal nSize As Long, _

    ByVal lpFileName As String) As Long
If you haven't used these functions before, here's a quick explanation of how they work. (If you have, feel free to skip the next few paragraphs.)
A profile is another name for an INI file. INI files are used by Windows and lots of Windows applications to store information from one run to the next—things like configuration settings, preferences, and screen layouts. Because this is so commonly
done by so many applications, Windows has provided a standardized profile layout and an easy way to access profile data. The format looks like Listing 37.10.
[Graphics]

Color=5

XPos=100

YPos=300

[Text]

Title=The Man About Town

CursorPos=15

CursorRow=7
And so on. You are looking at the contents of a single profile that has a file name with the extension INI. Notice that the file is divided into one or more sections. Each section has one or more variable=value entries. The variables are called Keys and
the values can be strings or numerics. All data in a profile is stored this way.
To access and change data in a profile, you use the two Win32 API functions declared in Listing 37.9. WritePrivateProfileString adds or changes information in the profile. The arguments you send to it follow (in order):
If the section or key doesn't exist, it is created in the profile.
GetPrivateProfileString is the counterpart read function, and its parameters follow:
Remember that strings always are passed by reference and that the use of ByVal in a declaration indicates that a C-style, null-terminated string is passed rather than a Visual Basic-style string.
So now that you have GetPrivateProfileString and SetPrivateProfileString at your disposal, what should the OK and Cancel button Click events in your Setup dialog look like? See Listings 37.11 and 37.12.
Private Sub cmdOK_Click()

Dim i As Long

Dim sValue As String

If optBeepBoxOn.VALUE = True Then

    sValue = "TRUE"

Else

    sValue = "FALSE"

End If

i = WritePrivateProfileString("Screen Saver.Boxes", _

    "BeepBox", sValue, "CONTROL.INI")

Unload Me

End Sub
Private Sub cmdCancel_Click()

Unload Me

End Sub
After the user clicks OK, the code checks to see which option button was clicked and sets sValue to TRUE or FALSE appropriately. Then a WritePrivateProfileString sets a key called BeepBox in a section of the CONTROL.INI file called Screen Saver.Boxes to
sValue. Normally, it is a bad idea to use the system INI files like WIN.INI, SYSTEM.INI, and CONTROL.INI to keep application-specific information. It usually is best to keep that stuff in an application-specific INI file. But screen savers are an
exception. Almost every screen saver has a section with the header Screen Saver.name in the CONTROL.INI. You could have made your own INI file, but this is a more standardized way of doing it.
And don't forget to add Listing 37.13 to the frmSetup Open event.
Private Sub Form_Load()

Dim sBeepBox As String

Dim i As Long

Dim iSize As Integer

sBeepBox = "        " ' 8 spaces

iSize = 8

i = GetPrivateProfileString("Screen Saver.Boxes", "BeepBox", _

    "TRUE", sBeepBox, iSize, "CONTROL.INI")

If UCase(Left(sBeepBox, 4)) = "TRUE" Then

    optBeepBoxOn.VALUE = True

Else

    optBeepBoxOff.VALUE = True

End If

End Sub
The inverse function, GetPrivateProfileString, is called to get the value, and the option boxes are set appropriately. Notice that I put eight spaces into sBeepBox before passing it. Be sure to always give your strings more room than they need when they
are passed by reference to an external function.
Okay, now you have a Configuration dialog box that enables the user to choose an option and remembers what the user chose. Now all that's left is to make the application use that information. First, declare a new global in the module's Declarations
section:
Global giBeepBox As Integer
Add appropriate lines to your Main procedure so that it looks like Listing 37.14.
Sub Main()

Dim sBeepBox As String

Dim i As Integer

Dim iSize As Integer

If App.PrevInstance Then End

sBeepBox = "        " ' 8 spaces

iSize = 8

If InStr(Command, "/s") > 0 Then

    CursorOff

    i = GetPrivateProfileString("Screen Saver.Boxes", "BeepBox", _

        "TRUE", sBeepBox, iSize, "CONTROL.INI")

    If UCase(Left(sBeepBox, 4)) = "TRUE" Then

        giBeepBox = True

    Else

        giBeepBox = False

    End If

    frmScreenSaver.Show

ElseIf InStr(Command, "/c") > 0 Then

    frmSetup.Show

End If

End Sub
If you are to run the screen saver, you get the BeepBox value from the profile and set the giBeepBox flag. Now in frmScreenSaver, Timer1's Timer event should look like Listing 37.15.
Private Sub Timer1_Timer()

Dim X1, Y1, X2, Y2 As Integer

X1 = Rnd * (ScaleWidth — 1) + 1

Y1 = Rnd * (ScaleHeight — 1) + 1

X2 = Rnd * (ScaleWidth — 1) + 1

Y2 = Rnd * (ScaleHeight — 1) + 1

ForeColor = RGB(Rnd * 255 + 1, Rnd * 255 + 1, Rnd * 255 + 1)

Line (X1, Y1)—(X2, Y2), , BF

If giBeepBox = True Then Beep

End Sub
The only change is the last line, which beeps for the new box, if it is supposed to.
That's it. Make a new SCR file, move it to the Windows directory, and give it a try! Depending on the WAV you have set as your system beep, you will find the new BeepBox feature to be somewhere on a scale between mildly annoying to completely maddening.
Good thing there's an option to turn it off!
Screen savers are easy to create in Visual Basic, once you get the structure down. You can use this code as a starting point to move on to bigger and better things. Here are some suggestions for future enhancements:
But most important, have fun!
In this chapter, you have walked through all the steps necessary to create a basic screen saver. It's not difficult, but there are some quirks. Now you have the tools you need to let your creativity run wild. Enjoy!
![]()
![]()
![]()